Thursday, October 28, 2021

Refining the Belle Epoque wargame

Using the same terrain card draw method, and the same deployment rules, I set up another Belle Epoque game. Instead of rolling up opposing forces, I simply maxed out the French with six line infantry units, a unit of Zouaves, a unit of tirailleurs, and two guns, giving in turn the British six units and two guns.  The British Irish and Scots Guards were rated elite, as were the  Zouaves and tirailleurs.

Starting positions, a view from the French side.

For this game I also made up two identical sets of Chance Cards, based on those used at Grid-Based  Wargaming - But Not Always.

French line infantry.

The terrain cards ended up with this long hill ending almost at mid-table, with the edge of a village directly beyond.  Per deployment rules both sides placed a unit in or on a terrain piece, so the Zouaves and the West Surreys line infantry regiment ended up starting the game in charge range of each other.

Zouaves and the West Surreys, starting game in charge range of eachother!

Both sides had significant flanking efforts underway.  Two British infantry and a gun were approaching from the "east", as were three French infantry and a French gun. Second French gun was coming late to the battle from the rear, and the Kings Royal Rifles was en route for the British.

Starting positions - you can see the large flanking forces to arrive from "east."

The French won the coin toss, and brought their full flanking force on table immediately, with the gun accompanying them pushing through the woods.  The British also brought their full flank on table and both sides arranged themselves for a big clash in and around the facing woods.

Zouaves pushed back, French line units moving up to support.

The other side of the table the Zouaves began a series of repeated assaults on the West Surreys in the town, usually repulsed with no lost strength points for the Zouaves. 

Major French attack on the woods underway, with British Volunteer Rifle units holding the line.

On the wooded side, three French line units and the tirailleurs began a general attack on the British (keep in mind the British are still dicing every turn to bring their eighth unit, the King's Royal Rifles, on table from the rear, so the French enjoy a slight numerical advantage).

British artillery firing away. Even with the +1 from the commander they were not very effective.

Then both sides drew "Ammunition Shortage" chance cards on the same turn. The French tried to take advantage of the situation by fixing bayonets and engaging in close combat on both flanks, but the British held tight.

French close combat assault on the woods.

The French commander leads a flank attack on the woods.

In the "west," the French, led by the brave Zouaves, threw themselves against the West Surrey and Worchestershire Regiments again and again, but were thrown back every time.

French attacks on the town make little progress.

By about turn 4 or 5 thing the British seemed in a  good position. They were withstanding French attacks, and the King's Royal Rifles had finally arrived from the rear.

Probably the high water mark for the British defense - French attacks making little progress with the British taking less casualties, and the Kings Royal Rifles have finally arrived on table.

However during the lull caused by the Low Ammunition events, the French gun which had entered from the flank, and moved through the woods, joined its companion in the field, and together both of them began a furious bombardment of the British center.

The combined French artillery line.

BOOM.  British gun and commander destroyed.  As the commander counts as 6 SP lost for calculation of exhaustion point, the British suddenly found themselves unable to advance toward the enemy.  However, a furious round of rifle fire the woods threw back the French and caused many casualties.

French taking heavy losses from the fight in the woods.

But the center things worsened.  French line infantry overran the second British gun, and the French artillery started bombarding the Scots and Irish Guards, who were frozen in indecision on the British back line. Meanwhile, the Zouaves succeeded in pushing into the town, with the defending West Surreys falling back into another building.

The disaster in the center. French artillery has killed the British commander and decimated the Scots and Irish Guards, and both British guns have been silenced.


Although the Zouaves would end up falling back out of the captured house due to fire from the W.Surreys, the Irish Guards were entirely broken by artillery fire, and the Royal Rifles took heavy casualties from French line, which pushed lost SP for the British over 50% and resulted in another French victory.

End of game. The French right is pretty beat up, but the left is fine, and the British center is in terrible shape.

Carnage around the wood.

Carnage in the center.

French on the French left.

French commander in the center.

What worked well: the chance cards were great, mixing things up a bit, but without creating swingy unbalance.  The deployment/terrain system is also working insofar as I am consistently getting fighting in or around terrain features, which feels more late-19th century versus early Napoleonic Wars-style linear battles, which is what a lot of rules push you towards, knowingly or unknowingly.  I really, really like the system of losing 1/3rd of your starting SP causes you be exhausted (you may no longer advance towards the enemy, even to follow up on a lost melee), and losing 1/2 is your break point.

What doesn't seem quite right:  although the games are centering on fights for terrain features, which is good, I'm noticing that artillery seems to end up sitting in the center and being the deciding factor. In the prior game the British were doing fine until their artillery suddenly didn't have any visible targets anymore. In this game, the British were fine until the French were able to bring both guns to concentrate fire on unsheltered units in the British center. A solution may be to flip terrain tiles differently so that there is terrain in the center so that artillery isn't presented with a perfect cone of fire in the middle every game.

Monday, October 25, 2021

Into the Belle Epoque!

This summer was awful for homecasting, just way too hot every weekend.  So a few weekends ago I finally got all the gear out and poured these customized British and French artillery crew figures, who would go with a bunch of Armies in Plastic krupp guns.  

Ready for paint!

In my previous 54mm Little Wars-style games, I had used Britains toy cannons for artillery, usually crewed by spare figures which I did not have in large enough numbers to field as infantry units. This certainly is in spirit with Wells but the look was not quite right. I was hoping these simple crew figures, which could take head swaps to change nationality, paired with the AIP guns, would look more the part.


Once the castings were done and cleaned up, I primed the guns with a simple gray spray paint. I painted the seat backings black but that's it.


Then out came the gloss varnish!


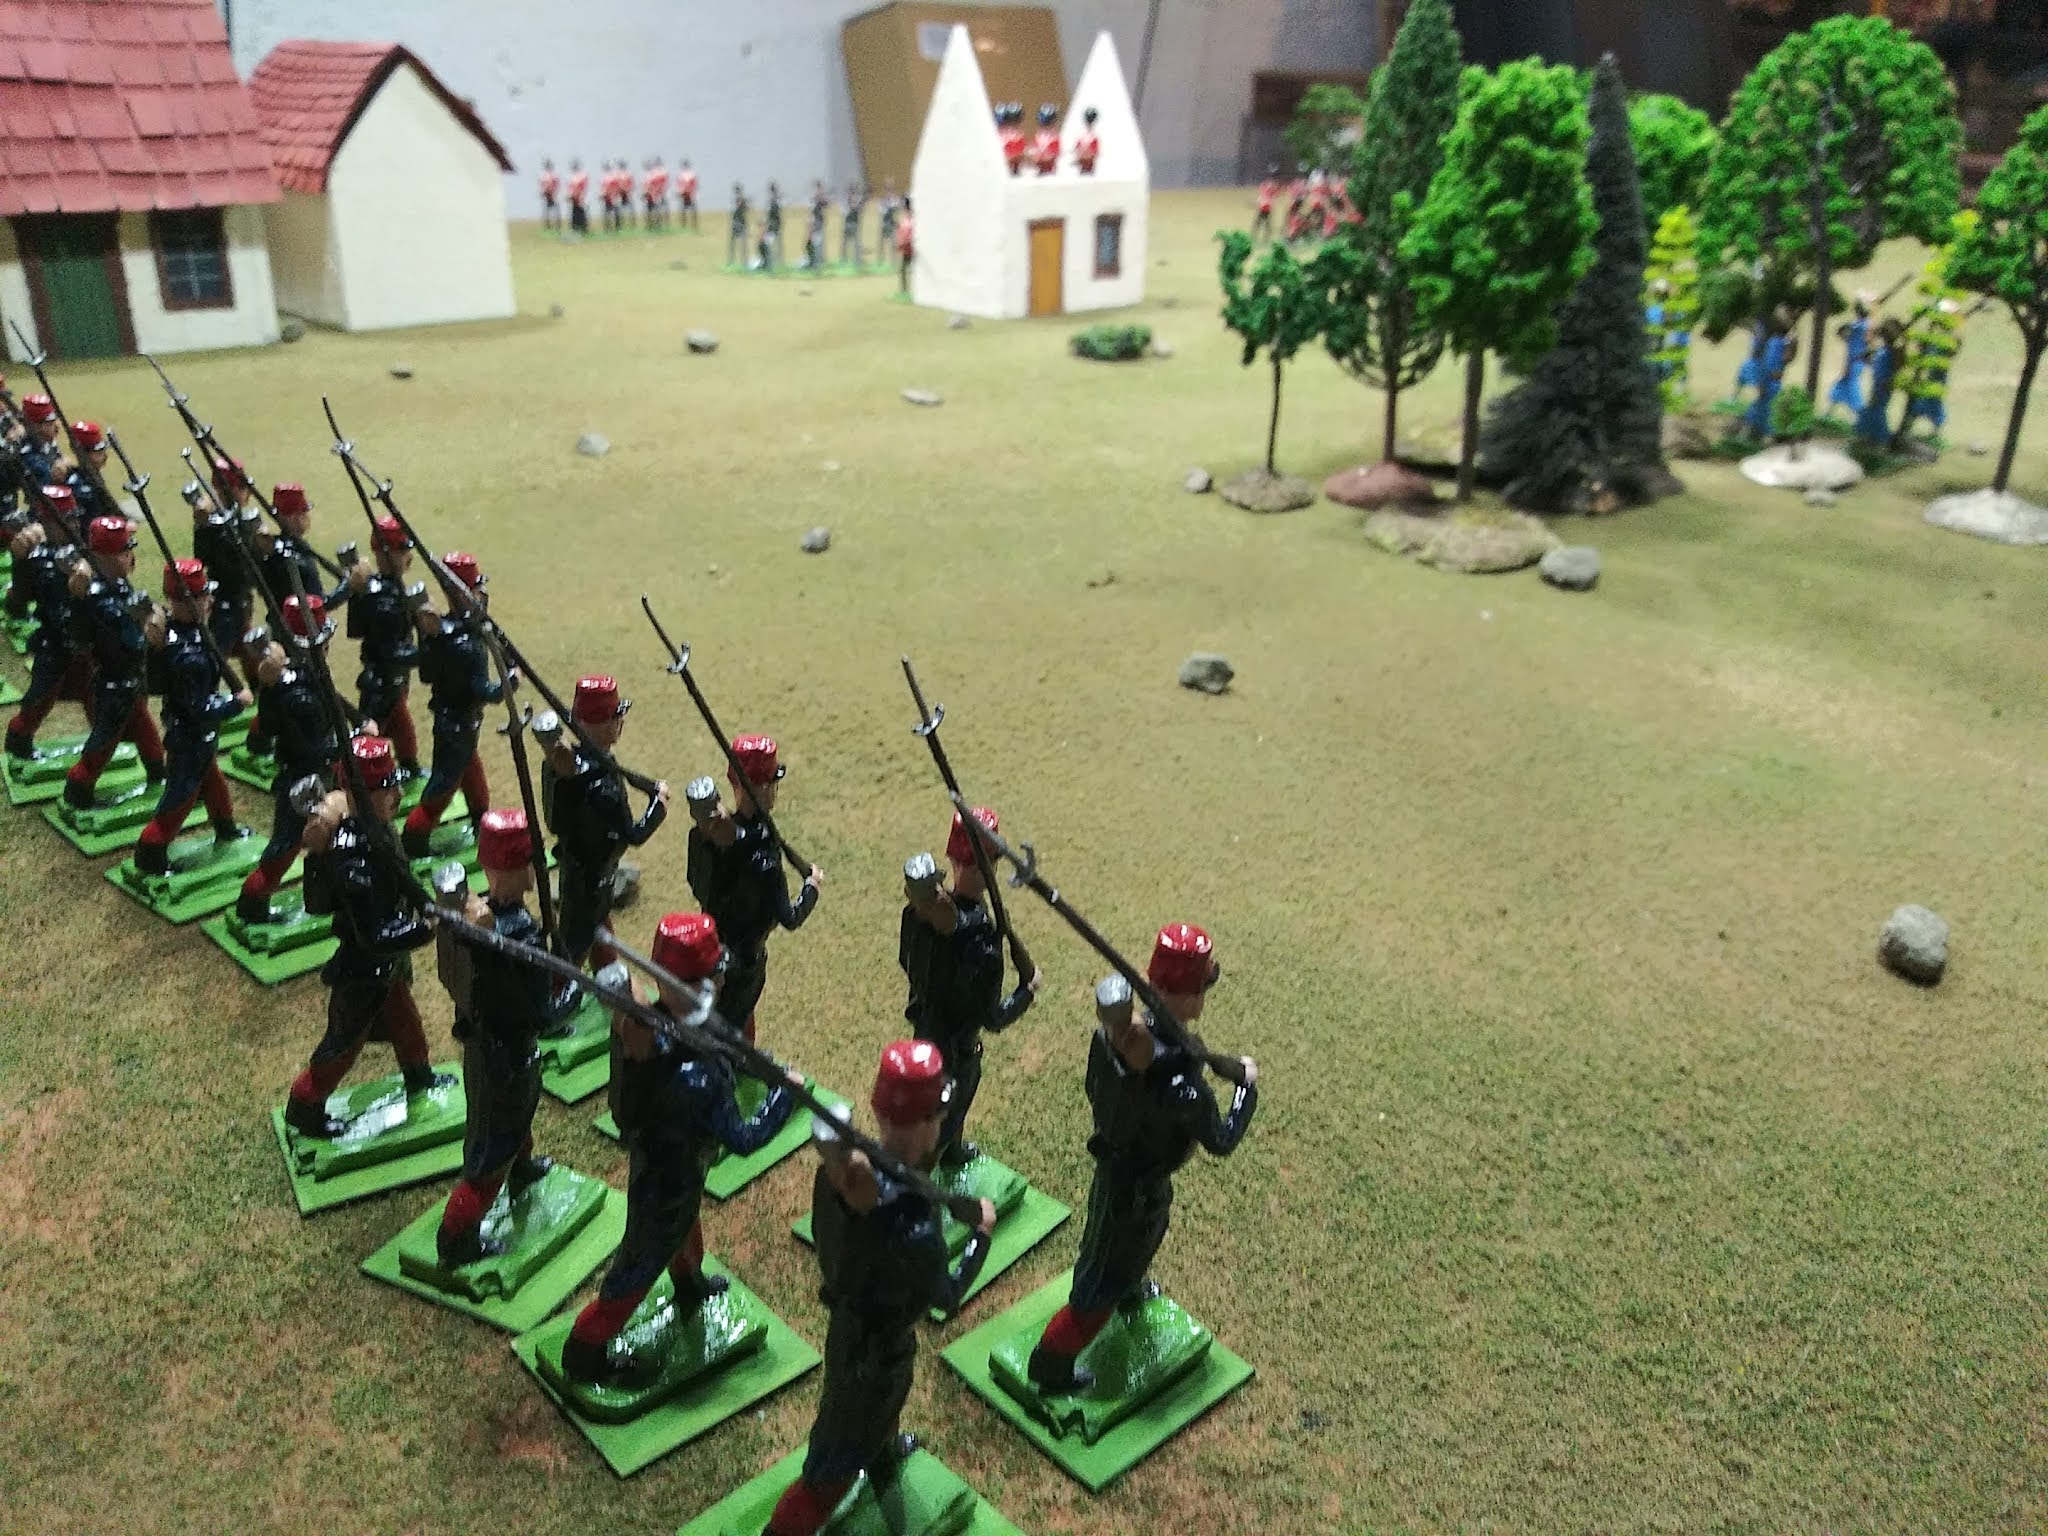
No choice but to get them on the table!  I rolled up random forces, used the terrain cards to create a table, and tried out my randomized deployment system for my draft Belle Epoque battle generator (needs a little clean up and then I will post it up).  I played around with various sizes of units.  The Portable Wargame assigns 4 strength points to an infantry unit, but a four-figure unit on a six-inch grid square looks a little skinny.  In the below photo, I played around with how 8-figure units looked, and while they looked great I ended up changing them to six-figure units.  Lost SP were tracked by knocking figures over, and an infantry unit which lost 4 out of 6 figures was destroyed.

Starting positions.  The two British units in lower right are off-table.

Both sides end up with six units of infantry and a gun. The British however had two elite units (Scots Guards and Irish Guards) to the French's one elite (Algerian tirailleurs).

French line infantry.

The Belle Epoque battle generator deployment foregoes deploying on the back line in a "traditional wargame" method in favor of deploying on, and next to or behind, a terrain piece.  My Belle Epoque terrain tile cards feature no "blank" tiles, so each quarter of the table has a terrain piece on it. Depending on the flipping of the tiles, these terrain pieces could be closers or further from the center of the table.

Newly recruited British artillery positions in the woods, with Scots Guards deployed to right. Retrospectively I think I did not count all artillery modifiers which may have made this gun less effective than it could have been...

So each side basically gets to deploy one unit in or on the terrain feature in each quarter on their half of the board, then place a single unit to the flank or behind that terrain feature.  1d3 remaining units are then diced for see if they are deployed from an off-table flank (3 French line were deployed as such, none for the British). Then it is diced to see if any units are on the "back line" but on-table, and then any remaining units are assumed to be in "reserve" off table to the rear.  The big difference between off-table Flank and off-table Rear units is that the Flank units are presumed to be part of the general's plan - they have partially chosen to fight here because they know they have a force in flanking position, so the Flanking off-table units may come on board at that player's discretion.  Off-table units to the Rear are presumed to be "marching to the sound of the guns" and may come on table if the dice result of a 1d6+1 (for each unit) is equal or less to the current turn number (so they will not enter on turn 1, but will certainly arrive by turn 7 at the latest).  All of this creates an effect similar to Wells' curtain-across-the-center-of-the-table proposition - when the set up is done and the curtain drawn back, as it were, both sides are presented with a unique set of tactical choices based on their positions and the enemy's positions.

French attacking the village, defended by British commander and Cheshire Rifle Volunteers.

Because the French had three flanking units and the British none, and because the French could see that two more British units would be arriving late from the rear, the French brought all three flanking units on table on the first turn.


Coupled with the elite tirailleurs in the woods opposite the village, and the French figured they could dogpile on the British in the village with four units while the other two French line infantry units kept the British left occupied.


This game was played using The Portable Wargame's late 19th century rules, with loss of 1/3rd strength points equaling exhaustion and loss of 1/2 strength points being the army's breaking point.  I have learned (and appreciate) that advancing your army is beneficial in  The Portable Wargame.  Otherwise, you will hit your exhaustion point with the majority of your army too removed from the action to still contribute in anyway.

French tirailleurs attack the Irish Guards.

The tirailleurs attacked the Irish Guards in the village many times but could not drive them out.  The tirailleurs would fall back but managed to avoid actually losing strength points.

Cheshire Rifles, and slain officer!

Things went less well for the volunteer rifles who were subjected to rifle fire and close combat attacks from three different French units, resulting in the death of the British commander.  The commander counts as 6 (!) points toward exhaustion point, so between this and some other losses, the British were already on the brink of defeat!

The Scots Guards fight against French regulars.

On the opposite flank the French diversionary attack against the British left wasn't going anywhere.  The Queen's Westminsters (another volunteer unit) had arrived from the rear and bolstered the line in the woods. 

New French artillery crew alongside the (dashing) French commander.

These two French line infantry units are on verge of breaking, but have succeeded in routing the Cheshire Volunteers and pushing the Irish Guards and [black helmets] out of the town.

In the village, the Cheshire Rifles were broken, but French attacks on the Worchestershire and Essex regiments failed to make significant gains. More importantly, however, the Irish Guards were at last pushed out their defensive position and then hard pressed by the tirailleurs, line units, and an French artillery fire, causing the Irish Guards to fall even further back.  

Scots Guards pushed back.

On the British left, the Scots Guards had been pushed back, although, along with the Queen's Westminsters, with few casualties. However, the two French line units had gotten close enough that they were not in clear line of sight of the British artillery in the woods anymore, and it was fire from the gun which had previously kept causing the French to fall back. But compared to the carnage and loss on the British right in the village, fighting was light.

Indecisive fighting in the woods.

Back in the village, the tirailleurs then rushed out of the seized position in the house and flanked the Irish Guards.

Irish Guards are flanked by tiralleurs.

This flanking attack by the tirailleurs cost the Irish Guards another lost strength point and pushed the British army past the breaking point. French victory.

Endgame.  The Irish Guards have fallen back and lost the 13th strength point (which would also break the Guards, actually, having lost 4 SP) to reach British breaking point.

The loss of the British commander really did in the British early, and I may scratch that rule. I also did not count a +2 modifier to hit for field artillery if they have unobstructed direct line of sight. This would have made the two guns much more effective and could have effected things greatly. I miss the look of the old 10-figure units but six-figure units give me more French to deploy. I would shrink the grid size to 5" or even 4" squares but that pushes the pebbles rather too close together and clutters the board, I think. Also my houses are all built to fit on a 6" square (some just barely), so a smaller grid would involve another round of house building. On other hand 4" squares would give a table about 24 squares wide and 20 deep which might work really well for Belle Epoque games? Hmm...

This was the first toy soldier game played on my flocked mat as opposed to plain felt, which I had previously avoided because I thought they would visually clash.  If anything I think the flocked mat makes the figures pop a bit more visually.  

Monday, October 18, 2021

Oathmark (II)

I got another game of Oathmark awhile back with Nellie.  I ran the same army as before, but broke my 18 figure archer unit into two smaller units of 9, split the 10 cavalry into two units of 5, and turned the Spellcaster Level 2 into two Spellcaster Level 1s.  This gave me more actions per turn and more options than the previous game. 

Gothic cavalry on the left on the advance.

Despite being better acquainted with the rules, this game ended up taking longer than the previous game. This was partially due to a 8-turn scenario played to the end, and also due to a long stoppage in play to confirm that there was in fact no rule saying friendly units could not move within 1" of each other. Still, almost three hours for a game with only 50-70 figures per side seems slow  (at least compare to lightening fast Portable Wargame games!).

And Gothic cavalry on the right on a flank move.

We were using the "Wind and Rain" scenario, where shooting attacks and movement become more and and more difficult over the course of the game.

Elves in a defensive block.

This showed the forward advance of the bulk of my army, and made the shooting of my archers almost completely useless.  Because Elves have a higher base shooting score, they were able to score enough hits to chip away at the humans.

The terrain was working against me here. The Elvish archers have nice clean line of sight all around while mine had a "window" through the two woods.

As you can maybe guess, this game ended in another win for Nellie's elves. I could probably do better hanging back out of archery range, waiting until all my units are as close as possible but still out of range and then having them all advance/attack at the same time. As it was, I allowed the elves to winnow down a few units piecemeal. 

Gothic infantry finally in melee, attacking Elvish left. I need to coordinate this better.

Its still a small sample size, but I also have a nagging feeling that elves are a little overpowered.  I know that having base score of +1 better for activations, melee, and shooting shouldn't make that much of a difference when you're using d10s, but that efficiency feels more like 50% better than 10% better. 

Gothic infantry attacking Elvish center. In distant background you can see what's left of my flanking cavalry attack still engaged with the Elvish left-rear.

Which kind of ties into a fault I see in a lot of these points-based kinds of games where units are not same-same to begin with: a unit getting a better stat (usually modifying a base target number by 1, so +16% probability on a d6 or +10% in the case of a d10) usually only results in a small bump in cost.  The Hail Caesar points system seems a case in point on this, with the points-value difference between a light and heavy infantry unit being quite marginal.  The Lion Rampant family is a little better at the extremes (six foot knigts are worth twice as much as 12 foot yeoman, and statistically feel equally superior) but gets fuzzy in the middle (archers and crossbows cost the same but crossbows feel quite superior on table).

Gothic cavalry attacking Elvish right.

I'm still not entirely sold on Oathmark, since the pace still seems sluggish, and I like games where a side can close with thier opponent quickly.