 |
| Initial setup. |
In 1500, Ludivico Sforza raised an army of Swiss mercenaries and sought to reclaim the Duchy of Milan from the French. After taking Milan he moved west and besieged the French garrison at Novarra, which was commanded by Yves d'Allegre (who would die
at Ravenna years later). A year or so ago I started building modular city walls, towers, and a gate, for English Civil War games, maybe (I don't think I had anything in particular in mind)? I had asked Pete if he wanted to come over for a in-person game and he suggested an Italian Wars game. I started trying to find a suitable battle to re-create and noticed the numerous sieges and figured it was time to give a siege game a try. I had long been aware of The Perfect Captain's
Seige! rules/board game for their
Spanish Fury! family of rules, and after perusing those, decided I could make a nice miniature tabletop/board game hybrid with them.
 |
| Week 2 |
The concept here is a game in two parts: (1) a resource management game which includes gridded movement and abstracted
Lion Rampant shooting attacks (artillery bombardments) and melees (sorties by the besieged) that concludes with (2) a final assault on a breach by the besiegers using the regular
Lion Rampant rules. Units suffer casualties throughout the abstracted first part of the game, which impacts the final assault in the second part.
 |
| Week 2 |
As you can see, I used gravel to mark out a grid in front of the city. There are five wall sections, each of which includes the 8" or so directly in front of the wall. Then there are three "rings" of five areas each extending out and away from the wall sections: inner, middle, and outer. The wall sections and outer ring are out of artillery range from each other. There are two villages in the outer ring. There are also two box lids on a side table, one of which represents the besieger's outrider patrols, and the other represents the besieged relief forces or raiders. Each area is approximately 1' square. A turn is one week.
 |
| Week 2 |
Each turn the besieger can have his engineers construct trenches or forts. A trench section cannot be built unless it is adjacent to existing trench area, except in the outer ring (which is out of artillery range). So on the first turn Sforza (Pete) built trenches in all five areas of the outer ring. In the second week he began to sap forward into the middle ring.
 |
| Week 2 |
Bombardments had a range of two squares. If two squares (for example, from a city wall section to the middle ring) the gun rolled 9 dice hitting on 5+. If one square, it was 12 dice at 4+. Trenches increased stamina by 1, forts and city walls by 2 (to a maximum of 4). Because this was abstracted and represented sustained bombardment over a week, for the expenditure of one precious powder point, the firing gun could resolve a shooting attack
against every unit in the target area.
 |
| Week 3 |
Wall sections had 5 "wall points" each. Expending a powder point to bombard a wall section automatically reduced the wall point by 1 in addition to executing a shooting attack against all units in that wall section.
 |
| Week 3 |
The French could sortie out from the town walls to disrupt trench building efforts or to try and cause casualties amongst Sforza's army. The French would place units in the area they were attacking via a sortie. Then Sforza could try and send rescue parties from the troops billeted in the villages. It is easier to come to the rescue if the sortie is in the outer ring than it is in the inner ring, although there are modifiers. The sortie combat was an abtracted form of Lion Rampant - each sortie unit simply chose to execute a melee or shooting attack against a besieger unit of their choice. Then the besieger could
choose to counter attack if they wanted. Then all units returned to their starting areas. Units could not be routed if failing a courage test (this is abstracted and over the course of a week, after all).
 |
| Week 3 |
There were two sorties during the game. the first was during week 2 and saw the city forces drive off some engineers in the middle ring.
 |
| Week 3 |
 |
| Week 3 |
 |
| Week 3 |
The second sortie was in week 3 and saw almost the entire garrison attack Sforza's forward trenches. Pete rolled exactly what was needed to and large rescue forces arrived to assist with both sorties. As a result, the French took the worse of it, especially their precious Landsknecht troops who would end up being useless in the defense of the eventual breach.
 |
| Week 3: an aggressive, desperate French sortie |
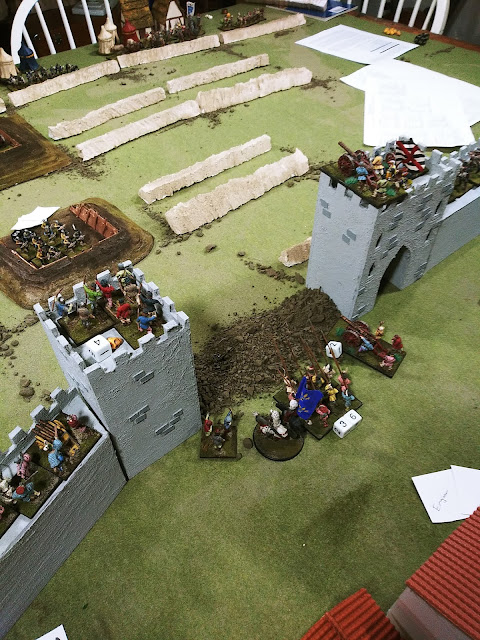 |
| Week 4: Wall is breached. |
In week 4, Sforza upgraded his forward trenches to forts and breached the wall.
 |
| Week 4 |
Then Sforza emptied the camps and villages and massed his army in the forward forts and trenches for the final assault on the breach.
 |
| Week 4: Massing for assault on the breach. |
However, the French finally rolled for additional supplies, and because Sforza's troops did not have a complete cordon across the table, two cavalry units from the exterior off table area were able to run an additional powder point into the city!
 |
| Massing |
Each wall section has an integral "wall gun" that cannot be moved and can only fire into the inner ring. Firing these wall guns costs a powder point just like the "normal" guns (the normal guns can also be moved to different sections of the walls). With the arrival of the extra powder point, the French were able to unleash 3 bombardments on the massed troops in the forward forts! Keep in mind that as this is abstracted, that meant that each separate gun got to execute an individual shooting action on all four to six units in the fort the gun was targeting. As a result, none or almost none of Sforza's units at the start of the assault phase were at full stamina points.
 |
| Massing |
The assault part of the game was played as a "regular"
Lion Rampant melee. Play would continue until either side had lost half of their starting units on table (so units in off table areas did not count). the arrival of the French cavalry meant the French had to lose 4 and Sforza's army had to lose 6.
 |
| Assault underway |
Landsknecht doppelsoldners initially attempted to hold the gap, but were easily pushed aside by the Swiss. French crossbows and archers poured missile fire down from the walls and towers on each side of the breach. But with both Landsknecht pike units in poor shape (9 and 6 casualties respectively!), the French gendarmes and "archer" cavalry had to sally out to wreck has much havoc as possible.
 |
| Gendarmes sally out. |
And havoc they did wreak, as the French were able to destroy 4 Sforza units! However, almost as quickly, the French cavalry was gone and the loss of an additional unit left the French 1 unit away from defeat.
 |
| Swiss carrying the breach. |
Many of Sforza's units were weakened, so as the French player I felt I had no choice to be aggressive. Units continued to counter attack in the breach, but finally the last unit fell, ending the game with Sforza's carrying the city.
 |
| French archers on the walls. |
 |
| Gascon crossbowmen on the walls. |
 |
| Endgame or close to it. |
In history, Novarra surrendered to Sforza after 21 days. A few weeks later his Swiss refused to fight against a French army that also contained Swiss mercenaries (this is sometimes identified as the Battle of Novarra (1500), not to be confused with
another Battle of Novarra in 1513 featuring another Sforza!). Sforza tried to sneak out disguised as a Swiss soldier but was betrayed to the French for 200 gold coins (about five years wages for a mercenary). When the traitor returned to Switzerland some years later he was identified and beheaded.
There was quite a lengthy post-game chat as we tried to puzzle out some of the things that did not work.
- Although strategic decisions about use of powder were tense (both sides finished the game with no powder left, and the last minute arrival of extra powder for the French made the final assault less of a sure thing), the relationship between remaining food, besieging troops sleeping in the trenches, and resulting attrition was flimsy and inconsistent. The Spanish Fury! rules require the besieged to take Attrition tests (which I translated into a Rally test, teh failure of which caused said unit to lose one stamina point, reflecting loss of men from deserters, disease, starvation, or exposure) on any turn there were 6 or less Victual points remaining (both sides started with 7). This ended up with the French taking a "Rally" test every turn except the first for every unit in the city! Per Spanish Fury!, the besieger must take Attrition tests based on the number of units in an area exceeding the billet factor (usually a base of 1, increased to 2 if trenches added, increased to 3 if a fort added). Seeing as Pete was fine with limiting the number of units to 2 per trench the besiegers thus never took an Attrition test, unless a unit had acquired a disorder marker from a Bombardment or Sortie. This felt unbalanced and needs to be made clearer.
- Sorties need some clarification. The besiegers getting an attack and then the besieged getting a counter-attack makes sense but what about the rescue forces for the besiegers? Do they get benefit of entrenchment bonus to stamina? How does cavalry fit in?
- The odds for getting reinforcements, whether additional provisions or troops, needs to be increased slightly. Both sides were slightly counting on getting maybe a unit or two more but none were received at all.
- If relief forces run supplies into the city, can they return to the exterior areas?
- The final assault part of the game needs more clarification and possible changes. I think all the gun models should simply be removed from play when this part begins - they have shot many many more times than they typically do in my usual field battle Lion Rampant games, and in the assault segment they just cluttered already crowded spaces. Again, the role of cavalry needs to be addressed - French gendarmes and Spanish ginettes fighting over a breach in a city wall during a siege did not feel right. Some better definitions about set-up for the assault segment might help a lot. I'm thinking that abstracted movement may help as well (Lion Rampant does work well on a grid, after all!)
- On review, the original Spanish Fury rules contemplate that each ring has 10 areas instead of 5. But it also only have 5 wall sections. 10 areas per ring is not really possible in my current set up, but I think that this means that the besieger in my game was doing half the work for the same payoff compared what the Spanish Fury rules envisioned (it takes half as many troops to cordon the city, half the engineers/time to trench complete across the board, and troops only have to cover half the territory). Furthermore, the villages are supposed to separate areas outside the outer ring and not part of the outer ring - this made establishing the cordon even easier.
In the end though, this hybrid of a miniatures game and a board game, was a visual treat and also a great combination of strategic thinking and resource management on top of crunchy combat rules and considerations for troop types. We will certainly be revisiting this!


