1. Games played.
Normans vs Normans game (January)
Marston Moor on St. Patrick's Day (March) - this one was a great idea!
Fornovo 1495 playtest (April)
Fornovo 1495 playtest (May)
Enfilade games x3, +2 hosted (May)
Fornovo 1495 with Portland's Finest (June)
First Newbury with Portland's Finest (July)
Napoleonic Lion Rampant x2 (August)
Calvern 1499 (August)
Agnadello 1503 (September)
Novara 1513 (November)
Warhammer 40k Rogue Trader game (December)
Braddock Down (December)
That's 18 games for the year (including 4 or 5 which I only GMed). This pales in comparison to the 30 I played in 2017, although since I've quit SAGA that's a big part of that drop off.
2. Miniatures Painted
The other blame for the drop off in play is the painting death march to get my Italian Wars armies up and running for Enfilade. So 12 less games played in exchange for 350 painted miniatures is a fair trade (I reckon). On top of that I speed-painted 60 Space Marines over the summer which was a fun change of pace.
And I am happy to report I have also painted 18 Romano-British/Arthurian cavalry, 12 infantry (to go with the 12 I painted a long time ago - featured in some of my old Song of Arthur and Merlin and SAGA games) and 24 archers, giving me a nice 7-unit Lion Rampant army, as well as just the other day finishing 36 Arthurian (aka "Migration Period") Saxons to go with the 24 of those I already had, giving me a Lion Rampant Saxon force of 5 units. To these I re-based my 24 Arthurian Irish to be Saxon or Romano-British allies (so 2 more foot units – giving me 14 units to split between two players). This one was on the to-do list over a year ago and I'm very pleased to have completed it and am excited to add Franks and Late Romans to this collection later on.
3. Up Next
For 2019 I am planning to host the third annual Ambuscade gaming event on February 9. I am also going to paint Spanish infantry for the Italian Wars in order to run Ravenna at Enfilade in May. After that I want to dig into aforementioned Franks and Late Romans, but also add a little more to my English Civil War collection to give me some more variability with that period.
Be seeing you in the coming year! Thanks for reading and following along!

Monday, December 31, 2018
Monday, December 17, 2018
Braddock Down 1643
Pete and Jamie were over on Saturday afternoon for the Last Game of the Year, in this case, the English Civil War battle of Braddock Down in January of 1643 using Pikeman's Lament. The historical context was the Royalist Baron Ralph Hopton was trying to break his Cornish army out of Cornwall but was blocked by a Parliament army operating out of Plymouth under Colonel William Ruthven. Ruthven was hoping to score a quick victory to quash Royalist support in Cornwall altogether, and thought he had pounced upon the stragglers of Hopton's army – only to discover he was facing Hopton's main army as a whole. Both sides drew up on opposite slopes of Braddock Down, and Hopton's Cornish Pike attacked. Parliament fired but once (hitting two Cornwall men) and then turned and fled, ending the battle!
This game was very enjoyable, which is especially important for two reasons: first, because I had ginned up a very diverse set of unit profiles that I was hoping would give a much more balanced game with the right amount of period flavor (I'm going to post all of those up in a separate post). In this particular game, the new units featured where a new Harquebusier cavalry unit (a slightly less enthusiastic Galloper with no wild charge and a pistol attack added) representing "generic" English cavalry for the period used by both sides, '42-'42 Harquebusiers (Trotters) representing early Parliamentarian cavalry which used Dutch cavalry tactics, the vaunted Cornish Pike (regular pike but with better Morale and Move scores to represent their enthusiasm), regular infantry divided into Seasoned Regiments (regular Pike and Shot) and Trained Bands (lower Morale and Move scores to represent their slight lack of enthusiasm). Finally, I used the artillery rules I have been using in my Italian Wars games (reload actions, dice thrown varied by range), and artillery units counted as their own "companies" (so failures trying to shoot or reload did not count against your Officers' companies). Also, I increased all infantry movements to 8". All unit profiles are included at the bottom of this post.
The second reason this game's success was important was the victory conditions set out. As you can see, I poured lines of flock about 12" from each long board edge. Braddock Down was fought in a slight depression between two low hills. Both sides deployed on an opposite hill. The flock lines represent the hills. Since this is essentially a defensive battle for the Royalists, Parliament's goal is to have units outnumbered the Royalist units on the Royalist hill. The Royalists want to push the Parliamentarians back to their starting positions, so their victory condition hinges on outnumbering the Parliamentarians in the middle zone. Therefore, a "major victory" for each side becomes evident (for both sides, really, have +1 unit than the other in both the middle zone and the Royalist zone), with draws and possible "minor victories" as well. This doesn't seem complicated or even particularly innovative but I've become aware recently of how often players in a game will keep their armies stationary and "play it safe" by slugging away with ranged attacks, which is particularly boring and unsatisfying if nothing else. "Objective zones," or whatever you'd like to call them, force the players to actually fight for "control of the field".
I probably gave Parliament too much infantry and had too much of it be "Seasoned Regiments" instead of "Trained Bands" but oh well. Since there were three of us, and since Parliament had 13 units vs. the Royalist 10, I took a smaller portion of the Parliament forces with Pete taking the majority, and Jamie played the Royalists. The starting dispositions found the Royalists on Beacon Hill, with their center held by the Cornish Pike, their left by two units of cavalry and a falconet, and their right by three cavalry units and falconet. Additionally, a unit of shot (Seasoned Regiment) were deployed forward behind hedgerows by the farm. Opposite them, Parliament had cavalry on the wings and a larger mass of infantry in the center.


Parliament surged off the hill and into the low ground, and its cavalry attacked on both flanks. On the Parliament right, harquebusiers used their follow-up attack to destroy a shot unit and rode right up on to Beacon Hill. On the left, Pete rolled boxcars and then another 6 and received a reinforcement unit of more '42-'43 Harquebusiers, and shooting by Royalist Dragoons was ineffective. With Parliamentary horse on the hill and the bulk of the Parliamentary infantry already halfway across the low ground in the middle, things seemed to be going extremely well.


But then the Royalist falconet fired upon aforementioned Parliament harquebusiers on the hill, and routed the unit, including its officer. This triggered a morale check on the other cavalry unit in that company, which also failed and fled. With the Parliamentary right gone, the Cornish Pike advanced down off Beacon Hill, and good shooting sent a unit of Parliamentary muskets packing as well. To top it off, Jamie rolled boxcars and the Royalists ended up with unit of Harquebusier reinforcements as well.

 After this counter-swing in fortune, the Parliament left's cavalry kept chipping away at the Royalist right, pushing them further and further back onto the hill. And in the center the Cornish Pike's advance faltered and began to break up. The "game clock" stopped when one side hit 50% units lost, and the Royalists were right on the brink. Parliament clearly had control of the middle zone, but the Royalists enjoyed a very slight (2 vs. 1) unit advantage on their hill. So Jamie played a little "dirty pool" (as described by Pete) and had his harquebusier unit attack Parliament pike in close order, a melee he predictably lost and therefore "stopped the clock." Parliament enjoyed a 5 units vs. 2 advantage in the middle ground and 1 vs. 2 disadvantage on the hill, so it was ruled a minor victory for Parliament.

You could argue that Jamie's "clock-stopping" was gamey and thus the "objective zones" victory condition didn't alleviate the sort of gamey-ness I was trying to solve. But I figure at least he was still attacking and not just turtled up, which is the behavior I am most-seeking to disincentive.

Further rule suggestion/modification arising from this game was to make it a little easier for guns to fire, since they are already limited by their needing a reload action and their limited shooting dice at longer range, a suggestion I agree with – if a falconet is only throwing 4 dice at 8"-16", you might as well let them plug away a bit.
ORDER OF BATTLE:
HOPTON (Royalists)
Horse Company #1
Dragoons 3pts
Dragoons 3pts
Dragoons 3pts
Horse Company #2
Harquebusiers 4pts
Harquebusiers 4pts
Foot Company
Seasoned Shot 4pts
Trained Band Shot 3pts
Cornish Pike 6pts
Cornish Pike 6pts
Cornish Pike 6pts
Falconets x 2 (6 pts)
Two light guns. These are hidden behind a horse unit. Secretly designate which.
TOTAL 48 points
RUTHVEN (Parliament)
Horse Company #1
Harquebusiers 4pts
Harquebusiers 4pts
Horse Company #2
'42-'43 Harquebusiers 4pts
'42-'43 Harquebusiers 4pts
Foot Company #1
Seasoned Shot 4pts
Seasoned Shot 4pts
Seasoned Pike 4pts
Foot Company #2
Seasoned Shot 4pts
Seasoned Shot 4pts
Seasoned Pike 4pts
Foot Company #3
Trained Band Shot 3pts
Trained Band Shot 3pts
Trained Band Pike 3pts
TOTAL: 49 points
UNIT PROFILES*
HOPTON'S ROYALISTS
HARQUEBUSIERS 4 Points
Attack 6+ Attack Value 4+
Move 5+ Defense Value 5+
Shoot 6+ Shoot Value/ Range 5+/6"
Morale 4+ Max. Move 10”
Stamina 3 # of Figures 6
Special Rules: Counter-charge; Compulsory Follow-Up (as per rulebook but can only be done once per game per unit)
DRAGOONS 3 Points
Attack 7+ Attack Value 5+
Move 5+ Defense Value 6+
Shoot 6+ Shoot Value/ Range 5+/12”
Morale 5+ Max. Move 12”
Stamina 2 # of Figures 6
Special Rules: Skirmish
CORNISH PIKE 6 Points
Attack 6+ Attack Value 5+
Move 5+ Defense Value 4+
Shoot -- Shoot Value/ Range --
Morale 3+ Max. Move 8”
Stamina 3 # of Figures 12
Special Rules: Close Order
SEASONED SHOTTE 4 Points
Attack 7+ Attack Value 6+
Move 5+ Defense Value 5+
Shoot 7+ Shoot Value/ Range 5+/18”
Morale 4+ Max. Move 8”
Stamina 2 # of Figures 12
Special Rules: First Salvo
TRAINED BAND SHOTTE 3 Points
Attack 7+ Attack Value 6+
Move 6+ Defense Value 5+
Shoot 7+ Shoot Value/ Range 5+/18”
Morale 5+ Max. Move 8”
Stamina 2 # of Figures 12
Special Rules: First Salvo
FALCONET 3 Points
Attack -- Attack Value --
Move 6+ Defense Value 6
Shoot/Reload 8+/6+* Shoot Value/Range 5-6+ /12”*
Morale 5+ Max. Move 8”
Stamina 1 # of Figures 4
Special Rules: *Reload: After a successful shooting action, cannot fire again until making a reload action at 7+, then 8+, 9+ etc.
Closing Fire on test at 8+.
Short Range (0”-6”): 12 dice @ 5+ (4+ if target Close Order) target @ -1 stamina & auto Morale test
Long Range: (6”-16”): 4 dice @ 6+
RUTHVEN'S PARLIAMENTARIANS
'42-'43 HARQUEBUSIERS 4 Points
Attack 6+ Attack Value 5+
Move 5+ Defense Value 4+
Shoot 6+ Shoot Value/ Range 5+/6”
Morale 4+ Max. Move 10”
Stamina 3 # of Figures 6
Special Rules: Caracole
HARQUEBUSIERS 4 Points
Attack 6+ Attack Value 4+
Move 5+ Defense Value 5+
Shoot 6+ Shoot Value/ Range 5+/6"
Morale 4+ Max. Move 10”
Stamina 3 # of Figures 6
Special Rules: Counter-charge; Compulsory Follow-Up
SEASONED PIKE 4 Points
Attack 7+ Attack Value 5+
Move 5+ Defense Value 4+
Shoot -- Shoot Value/ Range --
Morale 4+ Max. Move 8”
Stamina 3 # of Figures 12
Special Rules: Close Order
SEASONED SHOTTE 4 Points
Attack 7+ Attack Value 6+
Move 5+ Defense Value 5+
Shoot 7+ Shoot Value/ Range 5+/18”
Morale 4+ Max. Move 8”
Stamina 2 # of Figures 12
Special Rules: First Salvo
TRAINED BAND PIKE 3 Points
Attack 7+ Attack Value 5+
Move 6+ Defense Value 4+
Shoot -- Shoot Value/ Range --
Morale 5+ Max. Move 8”
Stamina 3 # of Figures 12
Special Rules: Close Order
TRAINED BAND SHOTTE 3 Points
Attack 7+ Attack Value 6+
Move 6+ Defense Value 5+
Shoot 7+ Shoot Value/ Range 5+/18”
Morale 5+ Max. Move 8”
Stamina 2 # of Figures 12
Special Rules: First Salvo
*NOTE: I have opted to tinker with things like Morale and Attack activation values more so than Stamina or Attack/Defense Values. During the Braddock Down game I tried to pay attention to Cornish Pike morale checks, because I had increased their morale to a base of 3+. I feel confident in saying Cornish Pike passed morale checks at 3 times and perhaps more by exactly hitting their target number. If their base morale was 4+ and not 3+ then all those passes are instead off by one and a Waver result instead. Similarly, the Harquebusiers have lower morale than their more rambunctious Cavalier cousins and the big difference between the foot of Seasoned Regiments versus Trained Bands is willingness to Attack and Morale and not Attack Values or Stamina.
This game was very enjoyable, which is especially important for two reasons: first, because I had ginned up a very diverse set of unit profiles that I was hoping would give a much more balanced game with the right amount of period flavor (I'm going to post all of those up in a separate post). In this particular game, the new units featured where a new Harquebusier cavalry unit (a slightly less enthusiastic Galloper with no wild charge and a pistol attack added) representing "generic" English cavalry for the period used by both sides, '42-'42 Harquebusiers (Trotters) representing early Parliamentarian cavalry which used Dutch cavalry tactics, the vaunted Cornish Pike (regular pike but with better Morale and Move scores to represent their enthusiasm), regular infantry divided into Seasoned Regiments (regular Pike and Shot) and Trained Bands (lower Morale and Move scores to represent their slight lack of enthusiasm). Finally, I used the artillery rules I have been using in my Italian Wars games (reload actions, dice thrown varied by range), and artillery units counted as their own "companies" (so failures trying to shoot or reload did not count against your Officers' companies). Also, I increased all infantry movements to 8". All unit profiles are included at the bottom of this post.
The second reason this game's success was important was the victory conditions set out. As you can see, I poured lines of flock about 12" from each long board edge. Braddock Down was fought in a slight depression between two low hills. Both sides deployed on an opposite hill. The flock lines represent the hills. Since this is essentially a defensive battle for the Royalists, Parliament's goal is to have units outnumbered the Royalist units on the Royalist hill. The Royalists want to push the Parliamentarians back to their starting positions, so their victory condition hinges on outnumbering the Parliamentarians in the middle zone. Therefore, a "major victory" for each side becomes evident (for both sides, really, have +1 unit than the other in both the middle zone and the Royalist zone), with draws and possible "minor victories" as well. This doesn't seem complicated or even particularly innovative but I've become aware recently of how often players in a game will keep their armies stationary and "play it safe" by slugging away with ranged attacks, which is particularly boring and unsatisfying if nothing else. "Objective zones," or whatever you'd like to call them, force the players to actually fight for "control of the field".
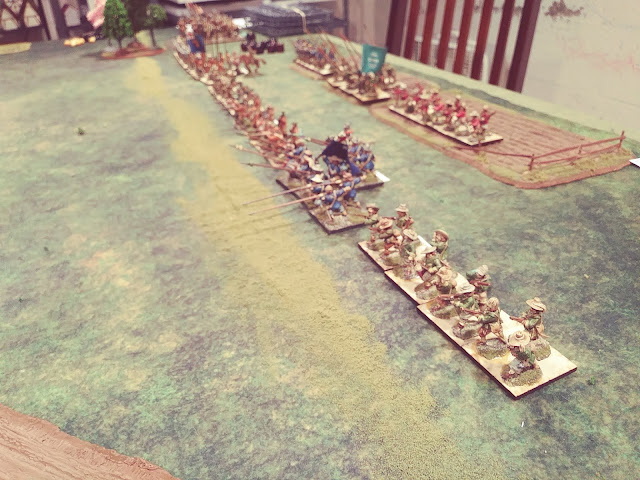
I probably gave Parliament too much infantry and had too much of it be "Seasoned Regiments" instead of "Trained Bands" but oh well. Since there were three of us, and since Parliament had 13 units vs. the Royalist 10, I took a smaller portion of the Parliament forces with Pete taking the majority, and Jamie played the Royalists. The starting dispositions found the Royalists on Beacon Hill, with their center held by the Cornish Pike, their left by two units of cavalry and a falconet, and their right by three cavalry units and falconet. Additionally, a unit of shot (Seasoned Regiment) were deployed forward behind hedgerows by the farm. Opposite them, Parliament had cavalry on the wings and a larger mass of infantry in the center.

(Above: Starting positions, Parliament on bottom, Royalist on top)

(Above: Parliament infantry)

(Above: Another view, Royalists on left, Parliament on right)
Parliament surged off the hill and into the low ground, and its cavalry attacked on both flanks. On the Parliament right, harquebusiers used their follow-up attack to destroy a shot unit and rode right up on to Beacon Hill. On the left, Pete rolled boxcars and then another 6 and received a reinforcement unit of more '42-'43 Harquebusiers, and shooting by Royalist Dragoons was ineffective. With Parliamentary horse on the hill and the bulk of the Parliamentary infantry already halfway across the low ground in the middle, things seemed to be going extremely well.

(Above: Parliament center advancing)

(Above: Parliament center advancing)

(Above: Royalist harquebusiers)
But then the Royalist falconet fired upon aforementioned Parliament harquebusiers on the hill, and routed the unit, including its officer. This triggered a morale check on the other cavalry unit in that company, which also failed and fled. With the Parliamentary right gone, the Cornish Pike advanced down off Beacon Hill, and good shooting sent a unit of Parliamentary muskets packing as well. To top it off, Jamie rolled boxcars and the Royalists ended up with unit of Harquebusier reinforcements as well.

(Above: Cornish Pike at center right. This is just before the Parliamentarian cavalry at the left side there ran away)


(Above: Endgame, I think. You can see how close Parliament pike units were to climbing Beacon Hill in the center there)
You could argue that Jamie's "clock-stopping" was gamey and thus the "objective zones" victory condition didn't alleviate the sort of gamey-ness I was trying to solve. But I figure at least he was still attacking and not just turtled up, which is the behavior I am most-seeking to disincentive.

Further rule suggestion/modification arising from this game was to make it a little easier for guns to fire, since they are already limited by their needing a reload action and their limited shooting dice at longer range, a suggestion I agree with – if a falconet is only throwing 4 dice at 8"-16", you might as well let them plug away a bit.
ORDER OF BATTLE:
HOPTON (Royalists)
Horse Company #1
Dragoons 3pts
Dragoons 3pts
Dragoons 3pts
Horse Company #2
Harquebusiers 4pts
Harquebusiers 4pts
Foot Company
Seasoned Shot 4pts
Trained Band Shot 3pts
Cornish Pike 6pts
Cornish Pike 6pts
Cornish Pike 6pts
Falconets x 2 (6 pts)
Two light guns. These are hidden behind a horse unit. Secretly designate which.
TOTAL 48 points
RUTHVEN (Parliament)
Horse Company #1
Harquebusiers 4pts
Harquebusiers 4pts
Horse Company #2
'42-'43 Harquebusiers 4pts
'42-'43 Harquebusiers 4pts
Foot Company #1
Seasoned Shot 4pts
Seasoned Shot 4pts
Seasoned Pike 4pts
Foot Company #2
Seasoned Shot 4pts
Seasoned Shot 4pts
Seasoned Pike 4pts
Foot Company #3
Trained Band Shot 3pts
Trained Band Shot 3pts
Trained Band Pike 3pts
TOTAL: 49 points
UNIT PROFILES*
HOPTON'S ROYALISTS
HARQUEBUSIERS 4 Points
Attack 6+ Attack Value 4+
Move 5+ Defense Value 5+
Shoot 6+ Shoot Value/ Range 5+/6"
Morale 4+ Max. Move 10”
Stamina 3 # of Figures 6
Special Rules: Counter-charge; Compulsory Follow-Up (as per rulebook but can only be done once per game per unit)
DRAGOONS 3 Points
Attack 7+ Attack Value 5+
Move 5+ Defense Value 6+
Shoot 6+ Shoot Value/ Range 5+/12”
Morale 5+ Max. Move 12”
Stamina 2 # of Figures 6
Special Rules: Skirmish
CORNISH PIKE 6 Points
Attack 6+ Attack Value 5+
Move 5+ Defense Value 4+
Shoot -- Shoot Value/ Range --
Morale 3+ Max. Move 8”
Stamina 3 # of Figures 12
Special Rules: Close Order
SEASONED SHOTTE 4 Points
Attack 7+ Attack Value 6+
Move 5+ Defense Value 5+
Shoot 7+ Shoot Value/ Range 5+/18”
Morale 4+ Max. Move 8”
Stamina 2 # of Figures 12
Special Rules: First Salvo
TRAINED BAND SHOTTE 3 Points
Attack 7+ Attack Value 6+
Move 6+ Defense Value 5+
Shoot 7+ Shoot Value/ Range 5+/18”
Morale 5+ Max. Move 8”
Stamina 2 # of Figures 12
Special Rules: First Salvo
FALCONET 3 Points
Attack -- Attack Value --
Move 6+ Defense Value 6
Shoot/Reload 8+/6+* Shoot Value/Range 5-6+ /12”*
Morale 5+ Max. Move 8”
Stamina 1 # of Figures 4
Special Rules: *Reload: After a successful shooting action, cannot fire again until making a reload action at 7+, then 8+, 9+ etc.
Closing Fire on test at 8+.
Short Range (0”-6”): 12 dice @ 5+ (4+ if target Close Order) target @ -1 stamina & auto Morale test
Long Range: (6”-16”): 4 dice @ 6+
RUTHVEN'S PARLIAMENTARIANS
'42-'43 HARQUEBUSIERS 4 Points
Attack 6+ Attack Value 5+
Move 5+ Defense Value 4+
Shoot 6+ Shoot Value/ Range 5+/6”
Morale 4+ Max. Move 10”
Stamina 3 # of Figures 6
Special Rules: Caracole
HARQUEBUSIERS 4 Points
Attack 6+ Attack Value 4+
Move 5+ Defense Value 5+
Shoot 6+ Shoot Value/ Range 5+/6"
Morale 4+ Max. Move 10”
Stamina 3 # of Figures 6
Special Rules: Counter-charge; Compulsory Follow-Up
SEASONED PIKE 4 Points
Attack 7+ Attack Value 5+
Move 5+ Defense Value 4+
Shoot -- Shoot Value/ Range --
Morale 4+ Max. Move 8”
Stamina 3 # of Figures 12
Special Rules: Close Order
SEASONED SHOTTE 4 Points
Attack 7+ Attack Value 6+
Move 5+ Defense Value 5+
Shoot 7+ Shoot Value/ Range 5+/18”
Morale 4+ Max. Move 8”
Stamina 2 # of Figures 12
Special Rules: First Salvo
TRAINED BAND PIKE 3 Points
Attack 7+ Attack Value 5+
Move 6+ Defense Value 4+
Shoot -- Shoot Value/ Range --
Morale 5+ Max. Move 8”
Stamina 3 # of Figures 12
Special Rules: Close Order
TRAINED BAND SHOTTE 3 Points
Attack 7+ Attack Value 6+
Move 6+ Defense Value 5+
Shoot 7+ Shoot Value/ Range 5+/18”
Morale 5+ Max. Move 8”
Stamina 2 # of Figures 12
Special Rules: First Salvo
*NOTE: I have opted to tinker with things like Morale and Attack activation values more so than Stamina or Attack/Defense Values. During the Braddock Down game I tried to pay attention to Cornish Pike morale checks, because I had increased their morale to a base of 3+. I feel confident in saying Cornish Pike passed morale checks at 3 times and perhaps more by exactly hitting their target number. If their base morale was 4+ and not 3+ then all those passes are instead off by one and a Waver result instead. Similarly, the Harquebusiers have lower morale than their more rambunctious Cavalier cousins and the big difference between the foot of Seasoned Regiments versus Trained Bands is willingness to Attack and Morale and not Attack Values or Stamina.
Friday, December 14, 2018
Warhammer 40,000 Rogue Trader (1e)
I obtained the Warhammer 40,000 Rogue Trader (aka the first edition) rulebook because I fondly remembered its everything-and-the-kitchen-sink artwork. Rereading I was reminded how thoroughly confused I was when I read it the first time: is it a RPG or a tabletop miniature wargame? Most of the rules by themselves, along with the photos, seem to indicate miniature wargame, but the writing style and a lot of the thematic bent felt more like a roleplaying game.
But rereading it, I felt like understood the book for the first time with great clarity: this was a wargaming skirmish ruleset, with a heavy emphasis on hosted scenarios. Furthermore, the way units interacted with each other and the combat system are really really similar in feel to most 19th century imperial and colonial wargame rules and scenarios - this is the various military elements of a far flung empire combating uprisings, piracy, petty warlords, and imperial rivals. Scenario objectives are crucial to avoid the game devolving into a pointless last-figure-standing slugfest.
So, after painting up four squads of ten space marines each for the loyalist Ultramarines and rebel Thousand Sons, as well as taking the time to draw up some handy reference sheets, we set up the "Hold on Tight" scenario from the Lion Rampant book. The target objective for both sides was a small building in the center, and a given side would score a victory point if it was in possession of the building at the beginning of its turn. The first side to accrue three points was the victor. Both sides diced and the rebellious red Thousand Sons went first.

(Above: initial deployments, after one turn of movement)

(Above: Ultramarines, ultra-ing)

(Above: Thousand Sons)
All these figures are second-hand, some in pretty rough shape. For the most part I made zero effort to remove old paint - just went in with new paint right on top, and stuck to my standard army painting block paint & wash & varnish routine.

(Above: Thousand Sons are first into the target building - why is it of strategic importance? Beats the eff outta me!)
Warhammer 40,000 Rogue Trader has a "Reserves" phase, which allows any figure that has not fired in its turn, and is more than 4" from an enemy, to move again. This allowed the Thousands Sons to easily get to the building first and occupy it, while the squad on their right took up positions behind a long, low ridge...


With the Thousand Sons in possession of the target, the game's combat system came into play. Missiles flew back and forth from both sides (mostly to little effect) while bolter fire took out a marine here or there.

Then the squad on the Thousand Sons' right made their move! Eight marines crested the low ridge and poured small arms fire into the Ultramarine squad lying in the nearby brush. At close range this was very effective. The Ultramarine center took it even worse, however, since they were in the open trying to assault the building. As the Thousand Sons picked up their second VP we almost called teh game, but decided to see what would happen on the Ultramarine turn.

What happened was the Ultramarines dropped a dead-on-target strength 8, -4 save Melta Missile into the building, killing all the remaining Thousand Sons defenders. The Ultras then proceeded to occupy the building, and hold it for a turn, picking up a point!

Unfortunately, the squads from the Thousand Sons' flanks were able to converge on the center and retake the building. The Ultramarines launched one last desperate melee attack to recapture the target.

And were thoroughly repulsed at great cost...

(Above: a pricey butcher's bill!)

And that was endgame as the Thousand Sons picked up their third VP.


This game is lethal! Out of 30 starting Ultramarines, seven were still standing at game's end. Out of 30 Thousand Sons, ten remained. We were happy with the terrain in terms of providing cover and breaking up line of sight. The borrowed Lion Rampant scenario idea was also very enjoyable. If this was a line-'em-up-and-have-at-it game it would have been rather boring... Playtime was about an hour and 45 minutes. We look forward to our next try-out game.
(Yeah I know non-historical)
Subscribe to:
Posts (Atom)